I travel light whenever I can, but I’m also rarely without my camera. Weekend trips are where I get the most creative: two outfits, a carry-on, and camera gear that actually gets used. Over the years I’ve learned to pack smart so I don’t end up paying for checked luggage or wrestling with oversized tripods in taxi boots. Here’s my approach—practical, a little personal, and ready to save you time at the airport and energy on the road.
Mindset before you pack
First, accept a little constraint. Packing everything you “might” need is tempting, but constraints force better choices. For a weekend (48–72 hours), I plan for realistic outfits, one camera kit that covers most scenarios, and backup solutions for batteries and storage. My goal: if I were delayed or had to move quickly, everything fits on my back or in the overhead bin without stress.
I also decide my photographic priorities before packing. Are you shooting portraits, landscapes, street scenes, or food? That choice determines the lenses and accessories you need and keeps me from bringing a lens for every mood.
Bag choice: the foundation of success
Your bag sets what’s possible. I prefer a carry-on backpack with a dedicated camera compartment—think Peak Design Everyday Backpack 20L or the Lowepro ProTactic series if you want more protection. A slim rolling carry-on works too, but you’ll need internal organizers for camera gear.
Key features I look for:
- Front or top access to camera gear so I don’t unpack everything at security.
- Compression straps or a cinch to keep clothes compact.
- A padded laptop sleeve (I use it for a spare battery bank or slim camera pouch if I’m not carrying a laptop).
- An exterior pocket for boarding pass, phone, and a sweater.
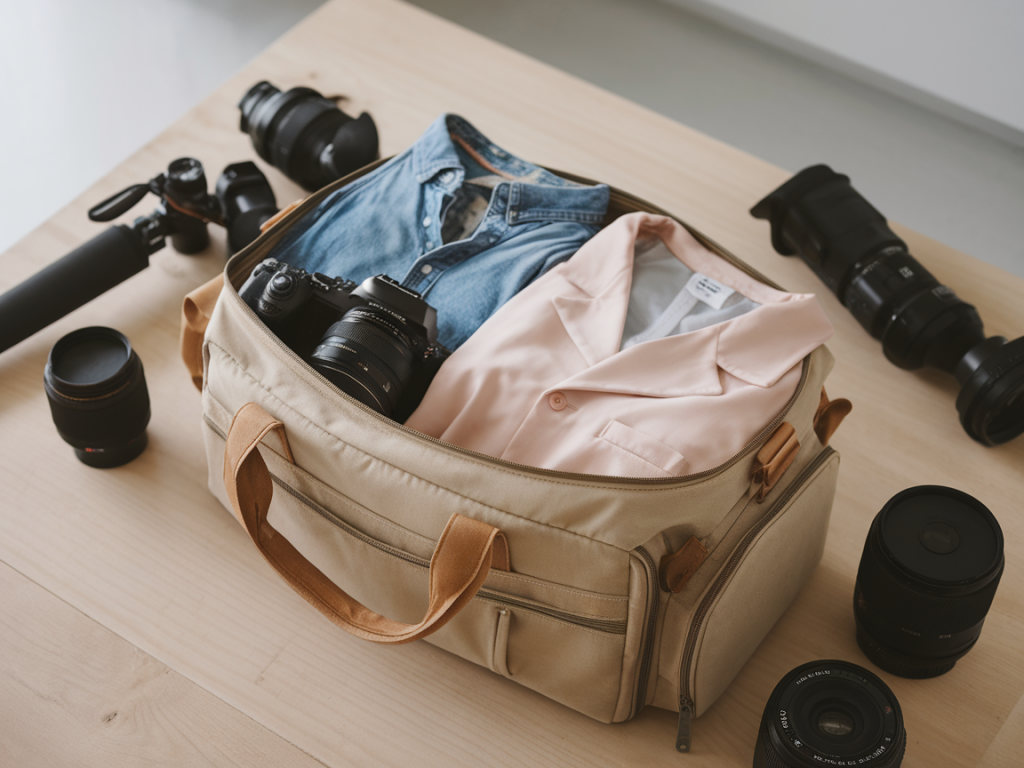
What I pack for camera gear
Less is more. Here’s my go-to setup for a weekend where I want flexibility without hauling a heavy bag.
- Camera body: one mirrorless body (Sony a7 series or Fujifilm X-T series for compact size).
- Lenses: a versatile zoom (24-70mm or 24-105mm equivalent) and a fast prime (35mm or 50mm) for low light and portraits.
- Spare battery: at least one; two if you’ll be shooting a lot.
- Memory cards: two additional cards—one as immediate backup, one empty.
- Small tripod: a travel tripod or tabletop tripod like the Joby GorillaPod for lightweight stability.
- Filters and cleaning kit: lens cloth, blower, and a polarizer if you anticipate bright skies.
- Charging gear: a dual USB charger or the camera’s lightweight charger and a USB battery bank capable of camera charging if supported.
Yes, that’s pared down—no second body, no big telephoto, no heavy lighting kit. For a weekend, I value mobility; that often yields better images than lugging extra gear and not using it.
Clothing: two outfits that do more
I pack two outfits that mix-and-match into more looks. For me, that often means:
- Outfit A: comfortable jeans or trousers, a neutral top, and a layer (cardigan or light jacket).
- Outfit B: a dress or a different-bottoms option (skirt or chinos) that pairs with the same jacket and shoes.
- Smart-casual shoes that are comfortable for walking (I often wear them on the plane to save space).
- One set of sleepwear and undergarments for each day plus one extra.
Pick neutrals and a pop of colour with an accessory—scarf or hat—to keep looks fresh without bulk. Rolling clothes tightly or using packing cubes keeps the bag tidy and compresses fabric nicely.
Packing order and placement
How you put things in the bag matters as much as what you pack. My order:
- Bottom compartment: shoes (in a small shoe bag) and a pouch with toiletries (travel-sized, leak-proof).
- Main compartment: clothes in packing cubes. One cube for outfit A, one for outfit B, one for extras like socks and underwear.
- Camera compartment: camera body with lens attached in the center position, spare lens and tripod tucked beside it. Memory cards and batteries in a small padded pouch on top.
- Exterior/access pockets: passport, phone, boarding pass, sunglasses, and a lightweight rain shell.
Carry-on camera security and airport tips
Airport security can be awkward with camera gear. I always do the following:
- Keep camera in an easily accessible compartment for inspection. A top-access camera cube is ideal.
- Have a printed or screenshot copy of your rental insurance (if applicable) or serial numbers for expensive gear.
- Use a TSA-compliant lock for zippers if you’re worried about transit (remember to unlock at security if asked).
- Consider declaring high-value items at check-in if required by the airline policy, though carry-on is usually preferred.
Essentials checklist (quick reference)
| Item | Where I put it | Tip |
|---|---|---|
| Camera body + lens | Camera compartment | Lens attached to reduce dust; use lens cap |
| Spare lens | Camera compartment, side pocket | Wrap in a microfibre cloth |
| Batteries & memory cards | Padded pouch in camera pocket | Charged and labeled |
| Tripod (travel) | Side or bottom of bag | Lightweight carbon or compact Gorillapod |
| Two outfits + shoes | Main compartment, packing cubes | Neutral colours, mix-and-match |
| Toiletries | Bottom shoe bag or toiletry pouch | Travel-sized; put liquids in clear bag |
| Chargers & power bank | Exterior pocket or laptop sleeve | Bring appropriate cables and a wall charger |
Backup plans and small luxuries
There are two small things I always add that make a weekend trip smoother:
- A tiny microfibre towel or packable shawl — useful as a changing cover, blanket, or impromptu wrap.
- An extra card reader or USB-C cable so I can offload photos to a laptop or phone if needed. I sometimes use the Lightroom mobile + a fast SD card reader to free up space mid-trip.
If you’re flying budget airlines with strict carry-on dimensions, measure your bag and be mindful of weight. I’ve had to remove my tripod and loop it onto the outside handle once; a quick decision to ditch non-essential items saved me a gate check fee and the stress of waiting at baggage claim.
On the road: habits that keep gear safe and usable
Once I reach my destination, I follow a few simple habits that protect my kit and keep me shooting:
- Always secure gear in the room safe if available.
- Charge batteries overnight and rotate—use one while another charges.
- Download and back up photos each evening to at least one other device or cloud service.
- Wipe lenses before shooting and keep dust out of the camera body by changing lenses as little as possible in windy or dusty places.
Packing light with camera gear is a balance of practicality and intention. You might leave something behind you’ll miss, but you’ll also gain mobility—and sometimes that’s where the best shots happen. If you’d like, I can share a printable packing checklist or a sample packing cube layout I use for the Peak Design backpack.