I used to overthink food photos — agonising over props, staging scenes for hours and editing until the image looked slightly too perfect. Slowly I learned that the most convincing “effortless” Instagram meals feel like a moment someone could actually have lived. The trick isn’t flawless styling; it’s creating small, repeatable habits that make everyday food feel photogenic without turning dinner into a production. Here’s how I do it, with simple gear, a few go-to moves and an editing routine that keeps images warm, real and inviting.
Start with the light you already have
Natural light is my first non-negotiable. I look for soft, indirect light — the kind you get from a north-facing window or on a cloudy day. Harsh midday sun can create blown highlights and deep shadows that scream “staged”, so I either shift the plate into shade or use a thin white curtain to diffuse the light. If I’m shooting in the evening, I’ll switch to a warm lamp (I like a simple IKEA Jansjö or a small LED panel like Neewer with a warm gel) and use a second light or a white surface as a subtle fill to avoid heavy contrast.
Choose a simple background and stick to a palette
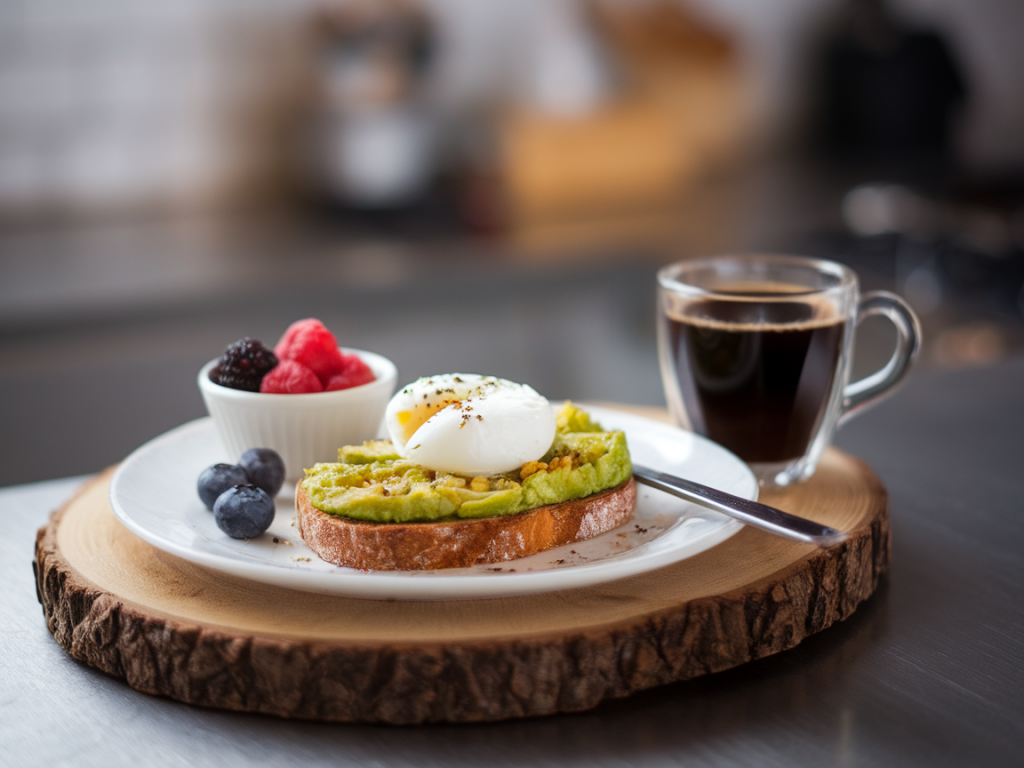
When I want an effortless look, I stop myself from grabbing every prop in sight. I pick one or two base surfaces — a wooden board, a marble tile, or a neutral linen — and a small set of plates/cutlery I like. Sticking to a consistent colour palette (muted earth tones, soft pastels, monochrome) makes my grid feel cohesive without much effort. My favourite combo: a slightly textured white plate, a linen napkin, and a wooden spoon. It works with most meals and lets the food be the star.
Composition that feels natural
Instead of perfect centring, I aim for an off-centre composition that mimics how you’d naturally place a bowl on a table. I use three easy framing approaches:
- Top-down: Great for bowls, pizza, or anything with a clear shape. Stand directly above and keep the plate filling 60–80% of the frame.
- 45-degree: Closer to how you view a plate at a table. This is flattering for layered dishes like burgers or stackable pancakes.
- Close-up/Detail: Focus on a bite, texture, or drizzle of sauce. Works well for sauces, seeds, or flaky pastry edges.
I vary these to keep my feed interesting. A quick rule: keep your horizon lines (table edges) straight — a tiny tilt can make an image feel amateur, unless you’re intentionally going for a casual, imperfect vibe.
Use negative space and small actions
Negative space gives the eye a place to rest. Instead of filling every corner, I leave some empty space and include a small action to imply life: a hand reaching in, crumbs on the plate, a spoon mid-scoop. These touches make the photo feel lived-in. I often sprinkle a few herbs or zest at the end and don’t worry about tidying every imperfection — those little flaws add authenticity.
Quick styling tricks that actually help
- Keep a jar of microgreens or herbs near the kitchen for last-minute garnish.
- Use a citrus wedge or a drizzle of olive oil to add shine and contrast.
- Choose one textured element (linen napkin, wooden board) and one shiny element (ceramic plate, metal fork).
- Layer plates or bowls for depth — place a smaller bowl slightly off-centre inside a larger one.
- Work in odd numbers: three olives, a small cluster of berries, etc. Odd counts feel more organic.
Gear: you don’t need a DSLR
Most days I shoot on my phone — an iPhone or Google Pixel does everything I need. Phones now have excellent cameras and computational HDR that help retain highlights and shadows. When I want a softer, film-like look I’ll use a compact mirrorless (I’ve used a Fujifilm X-series) for richer colour and shallower depth of field, but it’s not necessary for an effortless feed.
| Device | Quick settings |
| Smartphone (iPhone/Pixel) | Tap to focus, expose slightly lower for richer colours, use portrait mode for depth |
| Mirrorless/DSLR | Aperture f/2.8–5.6, ISO 100–400, shutter speed 1/60+ (use tripod if lower) |
Editing: consistency over perfection
I keep edits minimal and repeatable. I use Lightroom Mobile and occasionally Snapseed for quick fixes. My process:
- Crop and straighten: get the framing right first.
- Exposure and contrast: gently lift shadows + slightly reduce highlights to retain texture.
- White balance: warm the image a touch for food — it feels welcoming. I avoid extreme warmth that distorts true colours.
- Clarity and texture: +5–15 to bring out crumbs, seeds, or crusts, but not so much that skin or steam looks harsh.
- Saturation vs Vibrance: prefer vibrance for subtle colour boost. Oversaturation is an easy giveaway of over-editing.
- Use a preset: creating one simple preset for your aesthetic saves time and keeps your feed cohesive. I tweak it per image but rarely stray far.
Make a small workflow
To keep things feeling effortless, I made a tiny habit loop: shoot, edit, post. When I cook, I leave the best-looking dish in the light and take one or two quick shots before I eat. I edit immediately or batch-edit at the end of the week. Batching means I don’t obsess over every single post and my feed still feels intentional.
Caption & story: sell the moment, not the perfection
An effortless photo is complemented by an honest caption. I usually write something small: how long the recipe took, a quick tip, or a sensory detail (“the basil scent when I cut through the pie”). People respond to authenticity — a small story makes the photo relatable and keeps the “effortless” vibe intact.
Practice and keep it simple
The biggest change for me was learning to shoot regularly without waiting for a perfect setup. If I treat photography like part of cooking — a tiny, habitual action — my photos improve without stress. Aim for small, consistent improvements: a preferred napkin, a go-to angle, a single preset. Those few repeated choices build an effortless look more than any single fancy prop.