Travel

How to pack a camera-friendly carry-on outfit formula for weekend city photography

How to pack a camera-friendly carry-on outfit formula for weekend city photography

I travel with a camera almost every weekend, and over time I’ve developed a simple carry-on outfit formula that helps me feel comfortable, look put-together, and — most importantly — keep my camera within reach for spontaneous city shots. This isn’t about rigid capsule wardrobes or fashion rules. It’s about being practical, light, and ready to move: whether I’m chasing the golden hour down a cobbled street or ducking into a café for a quick portrait. Below I share the exact approach I use, the items I rely on, and the tiny packing habits that make photography-focused travel smoother.

Why a camera-friendly carry-on outfit matters

When you’re in a new city with a camera, the last thing you want is to be fussing with layers, digging through a backpack, or worrying about weather you didn’t prepare for. A good outfit formula solves those pain points by prioritising:

  • Accessibility: easy access to your camera and pockets for extra batteries or a phone.
  • Mobility: freedom to walk, crouch or climb small staircases without fear of wardrobe malfunctions.
  • Weather-readiness: adaptable layers that handle drizzle, wind or unexpected sunshine.
  • Style-in-practice: pieces that photograph well and don’t draw awkward attention.
  • The core pieces I always pack

    My formula revolves around four wearable categories: a base layer, an insulating layer, a lightweight outer layer, and comfortable shoes. I treat these as a team rather than separate items.

  • Base layer: a neutral tee or thin knit — breathable cotton or a cotton-blend tee works well. I favour mid-tones (olive, navy, warm beige) because they hide light dust and photograph nicely against city backdrops.
  • Insulating layer: a shirt or lightweight sweater that adds warmth and looks good open over the tee. Linen shirts in warmer months and a merino or cotton-silk blend in cooler months are my go-tos.
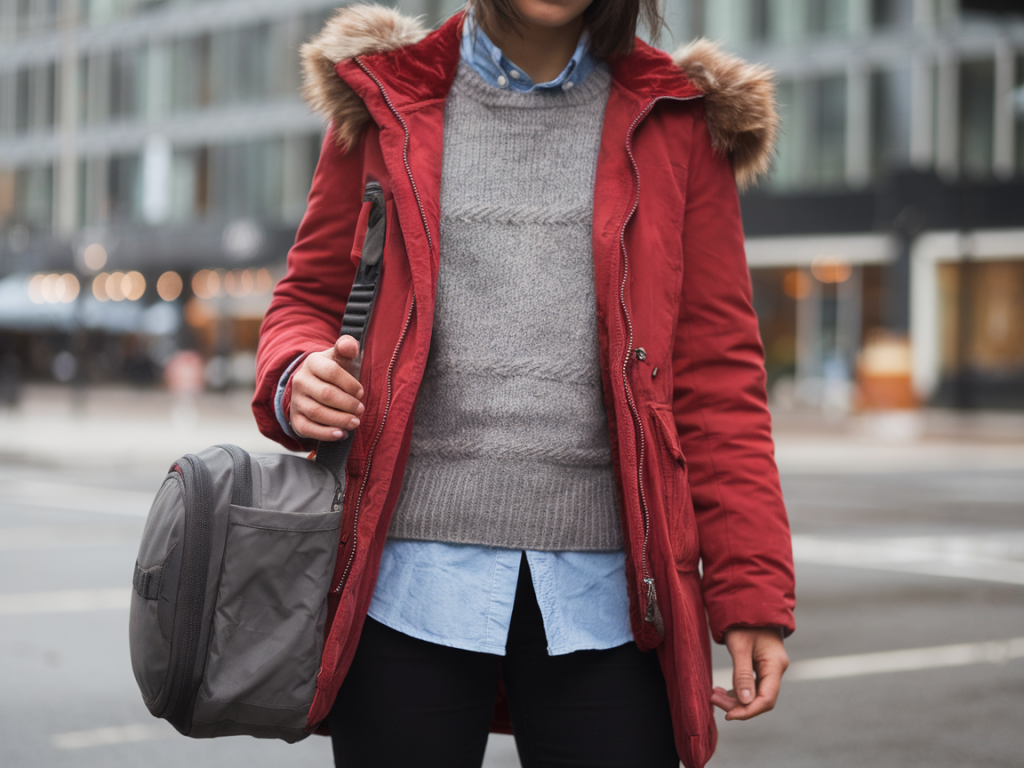
  • Outer layer: a packable jacket — think a short trench, a light rain shell or a bomber. It needs to fold into your carry-on easily and still allow camera straps to sit comfortably.
  • Shoes: sensible, broken-in shoes that are also tidy enough for cafés and galleries. I rotate between leather sneakers (Veja or a simple white trainer), lightweight boots (Blundstone-style Chelsea or desert boots), and compact walking shoes (Merrell or Ecco).
  • Pockets, straps and camera access

    Access is everything. I almost always wear my camera on a strap across the body (crossbody) for quick grabs. For pockets, I follow a rule: keep all photography essentials in pockets or compartments that don’t require digging into the main bag.

  • Front pockets: phone, transit card, small lens cloth.
  • Inside jacket pocket: spare battery and a tiny multi-tool or lens cap.
  • Belt or hip pouch: I sometimes use a slim camera pouch (Peak Design Capture Clip or a small Ona pouch) attached to my belt or the strap of my bag for instant access to a compact camera or extra lens.
  • Try on your full outfit with the camera before you leave. Does the strap hit your sternum or get in the way when you crouch? Adjust strap length so the camera sits around your hip when at rest and can be raised quickly to eye level.

    Fabrics and colours that work for photos

    For city photography, patterns can be distracting and loud colours can reflect unwanted tones onto skin. I opt for:

  • Matte fabrics: avoid shiny synthetics that reflect light unpredictably in photos.
  • Earthy neutrals and muted tones: navy, olive, rust, warm grey and cream. They complement urban backdrops and skin tones without monopolising the frame.
  • Texture over pattern: a textured knit or brushed cotton adds visual interest without being overwhelming.
  • Packing smart: how I fold the outfit into a carry-on

    I travel carry-on only most of the time, so packing efficiently matters. I wear my bulkiest items on the plane (jacket, boots, camera strap) and pack the rest using this mini-system:

  • Roll the base layer and insulating layer: rolling reduces creases and leaves room for a padded camera cube.
  • Jacket goes on top: a foldable rain shell or light jacket sits over the rolled layers and adds a bit of cushion for delicate gear.
  • Shoes — I either wear them or pack them in shoe bags at the bottom, with socks stuffed inside to save space.
  • Camera gear: I use a compact padded insert (Peak Design Field Pouch or a small ONA camera cube) that fits inside the carry-on and keeps the camera separated from clothes.
  • Quick outfit combos I rotate on weekends

    I like to have three ready-to-go combos that mix and match. They cover different weather and activity types, and each one keeps the camera accessible.

  • Urban walker (mild weather): neutral tee + linen shirt (worn open) + lightweight denim + leather sneakers + crossbody camera strap.
  • Rainy explorer: merino long-sleeve + thin fleece or sweater + packable rain shell + compact boots + camera inside a clipped pouch under the shell for protection.
  • Evening photo-walk: fine-gauge knit + tailored trousers or dark jeans + low ankle boots + trench/jacket; keep the camera strap subtle with a leather strap.
  • Small accessories that make a difference

    Never underestimate a few small items that make photography travel easier:

  • Microfibre cloth: for quick lens wipes.
  • Spare SD card and battery in a waterproof travel case: tiny, cheap insurance against losing shots.
  • Neutral scarf: adds warmth, layers well, and doubles as a soft surface to set gear on if needed.
  • Compact umbrella: ultra-light and fits inside the carry-on; I always choose a black or neutral one that won’t show dirt.
  • How I adapt for different camera setups

    If I’m taking a small mirrorless camera (Fujifilm X-series, Sony a6000/7 family), the outfit stays very similar. The camera is light enough to wear all day crossbody. For a DSLR or a larger lens, I make these adjustments:

  • Wear a slightly stiffer jacket with inside pockets: it helps support extra weight.
  • Use a camera harness or a chest-mounted system: better weight distribution means less shoulder strain.
  • Limit clothing layers: fewer layers mean the strap won’t slip as much and you can adjust more quickly.
  • Example capsule outfit table

    Piece Item Why I choose it
    Base layer Neutral cotton tee (navy or olive) Breathable, hides dust, photographs well
    Insulating layer Linen shirt or thin merino Layerable texture and warmth without bulk
    Outer layer Packable rain shell or short trench Weather protection and pockets for essentials
    Shoes Leather sneakers or compact boots Comfortable for walking, tidy for cafes
    Accessories Crossbody strap, microfibre cloth, spare battery Ensures quick camera access and upkeep

    Try this formula on your next city weekend. Adjust the fabrics to suit the season and your camera weight, and you’ll find it’s a small change that makes a big difference to how freely you can shoot. If you’d like, I can suggest specific packing lists for summer, autumn and winter versions of this formula — tell me which season you’re planning for and what camera you use, and I’ll tailor a list.
    You should also check the following news:

    A guide to the french school system
    Lifestyle

    A guide to the french school system

    Understanding the French school systemThe French school system is known for its clear structure,...

    Jul 15 Read more...
    How to swap one evening screen habit for a 20-minute curiosity ritual that actually sticks
    Personal Growth

    How to swap one evening screen habit for a 20-minute curiosity ritual that actually sticks

    I used to end most evenings with the same small ritual: half an hour of doom-scroll, a quick dive...

    Aug 13 Read more...